On this page:
Korps Grinda Returns!
In a strange quirk of fate, one of the Gargants named Korps Grinda II found itself surrounded and cut off far behind Imperial lines, and was left with no option other than to try to inflict as much damage as possible before it was destroyed. The stage was set for a reprise of Gogard’s Last Stand!
Ork Forces
- One Ork formation consisting of Korps Grinda II, a Great Gargant war engine unit.
The force has a Strategy Rating of 3. All formations have an Initiative value of 3+.
Apply the Mob Rule and Power of the Waaagh! special rules to all Ork formations.
Space Marine Forces
- One Space Marine formation consisting of six Tactical infantry units, three Rhino vehicle units and one Captain character upgrade.
- One Space Marine formation consisting of four Devastator infantry units and one Captain character upgrade.
- One Space Marine formation consisting of four Land Raider vehicle units.
- Two Command Bunkers.
The force has a Strategy Rating of 5. All formations have an Initiative value of 1+.
Apply the They Shall Know No Fear special rule to all Space Marine formations.
Datasheets
| Name | Type | Speed | Armour | CC | FF | Weapons | Range | Firepower |
|---|---|---|---|---|---|---|---|---|
| Great Gargant | WE | 15cm | 4+ | 3+ | 3+ | Gaze of Mork | 30cm | MW4+, TK |
| 2 × Big Gun | 45cm | AP5+/AT5+ | ||||||
| Soopagun | 60cm | 2BP, MW, FxF | ||||||
| 1–2 × Twin Soopagun | 60cm | 3BP, MW, FxF | ||||||
| 0–1 × Lifta-Droppa | 60cm | MW3+, TK(D3), FxF | ||||||
| and (base contact) | (Assault Weapons) EA(+1), TK(D3) | |||||||
| Damage Capacity 12. D6+6 Power Fields. Fearless. Reinforced Armour. Walker. Armed with either two Twin Soopaguns, or a Twin Soopagun and Lifta-Droppa. Critical Hit Effect: The unit catches fire. Roll a D6 for each fire burning on the unit in the End phase of each turn. On a roll of 1 a second fire starts, and on a roll of 5–6 the fire is put out. Any fires not put out cause one point of damage. |
||||||||
| Name | Type | Speed | Armour | CC | FF | Weapons | Range | Firepower |
|---|---|---|---|---|---|---|---|---|
| Captain | CH | - | - | - | - | Power Weapon | (base contact) | (Assault Weapons), MW, EA(+1) |
| Invulnerable Save. Leader. Commander. | ||||||||
| Name | Type | Speed | Armour | CC | FF | Weapons | Range | Firepower |
|---|---|---|---|---|---|---|---|---|
| Tactical unit | INF | 15cm | 4+ | 4+ | 4+ | Bolters | (15cm) | (Small Arms) |
| Missile Launcher | 45cm | AP5+/AT6+ |
| Name | Type | Speed | Armour | CC | FF | Weapons | Range | Firepower |
|---|---|---|---|---|---|---|---|---|
| Rhino | AV | 30cm | 5+ | 6+ | 6+ | Storm Bolter | (15cm) | (Small Arms) |
| Name | Type | Speed | Armour | CC | FF | Weapons | Range | Firepower |
|---|---|---|---|---|---|---|---|---|
| Devastator unit | INF | 15cm | 4+ | 5+ | 3+ | 2 x Missile Launcher | 45cm | AP5+/AT6+ |
| Name | Type | Speed | Armour | CC | FF | Weapons | Range | Firepower |
|---|---|---|---|---|---|---|---|---|
| Land Raider | AV | 25cm | 4+ | 6+ | 4+ | Twin Heavy Bolter | 30cm | AP4+ |
| 2 x Twin Lascannon | 45cm | AT4+ | ||||||
| Reinforced Armour. Thick Rear Armour. Transport (may carry one Terminator unit OR two of the following units: Tactical; Devastator). | ||||||||
| Name | Type | Speed | Armour | CC | FF | Weapons | Range | Firepower |
|---|---|---|---|---|---|---|---|---|
| Command Bunker | WE | Immobile | 4+ | - | - | - | - | - |
| Damage Capacity 3. No units may enter the bunker as it is filled with communications gear. | ||||||||
Playing Area
Set up the playing area approximately 90–120cm square, including the features shown on the deployment map below. Set up any further scenery you have in a mutually agreeable manner.
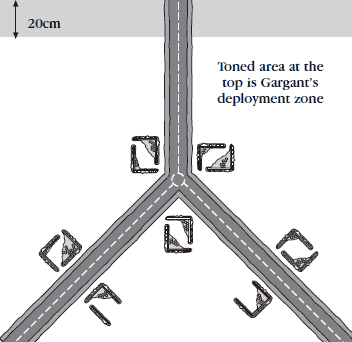
Deployment
The Space Marine player deploys first:
- Set up the two command bunkers anywhere on the table, but at least 15cm from a table edge. These are the objectives of the Ork attack.
- Deploy one of your formations on the table, either in or touching the ruined buildings by the Y junction.
- Keep your remaining two formations in reserve. You will bring them into play anywhere along your table edge (including on the roads), during the first turn of the battle. Deploy one unit from each of these formations on the table edge to show where they will enter play. Their move on the first turn must be measured from this point.
Then, the Ork player deploys:
- Deploy your Great Gargant anywhere within 20cm of your table edge, as shown on the deployment map.
Victory Conditions
Play until either Korps Grinda II or both the command bunker objectives are destroyed.
- If the Space Marines destroy Korps Grinda II without losing either command bunker then they win the game.
- If the Space Marines destroy Korps Grinda II but one command bunker is destroyed then the game is a draw.
- If the Orks destroy both command bunkers then they win.
Special Rules
Orks believe that as long as there’s a bunch of them still fighting together (slightly more than they can count up to is ideal!) then there’s always a chance that they’ll prevail, no matter the odds.
To represent this, Ork formations with more than five units (that is, too many to count on the fingers of one hand), not including Gretchin or Big Gunz units, receive a +1 modifier to any Rally test rolls they make, and formations with more than 10 such units receive a +2 modifier. For war engines, count each point of initial damage capacity as a unit for the purposes of this rule.
Orks are not noted for their organisational abilities, and thus usually have a pretty poor Initiative rating. However, if there is one thing that will galvanise an Ork warband, it’s the thought of a good punch-up.
To reflect this, apply a +2 modifier when you attempt an Action test for an Ork formation if the action is Charge or Double (or for Ork aircraft, Interception or Ground Attack).
Some Ork war engines are protected by banks of power fields. The number each war engine has is noted on its datasheet.
Each power field will automatically absorb one hit and then collapse. Do not make armour saves for damage absorbed by power fields, nor allocate Blast markers. Power fields cannot be repaired.
Once all of the power fields have collapsed, hits affect the war engine as normal and you may attempt saving throws in the usual way. Hits from close combat ignore power fields but units using their Firefight values must first knock down remaining power fields before they can damage the war engine.
Space Marines are renowned for their tenacity and bravery. To represent this:
- Suppression: It takes two Blast markers to suppress a Space Marine unit.
- Becoming Broken: Space Marine formations become Broken only when they have two Blast markers per unit in the formation, rather than one per unit.
- Destroying units in a Broken Space Marine formation: It takes two Blast markers to destroy a Space Marine unit in a Broken formation (round in favour of the Space Marines).
- When you work out the result of an assault: Count only half the number of Blast markers for Space Marine formations (round down in their favour, to a minimum of one — they will not gain the +1 modifier for having no Blast markers). Count a Broken Space Marine formation as having one Blast Marker per unit.
- When a Space Marine formation loses an assault: Halve the number of extra hits it suffers (round down in favour of the Space Marines).
- When a Broken Space Marine formation rallies successfully: Give it a number of Blast markers equal to the number of units, rather than half this number.
- When a Space Marine formation rallies successfully, or regroups: For each unit with the Leader ability, remove two extra Blast markers from the formation, rather than one.