On this page:
Battle 5: Ambush
| [Content from Battles Book page 94 to 95.] |
An army on the march is caught in an ambush by an unexpected enemy force. The ambushers must use the advantage of surprise to keep the enemy forces off balance and separated while they bring in reserves to finish them off. The defenders desperately try to amass their strength before they are wiped out.
The following special rules are used in this scenario: Reserves, Hidden set-up, Army morale.
Forces
Each player picks an army to a pre-agreed points total.
Set-up
- Determine who will be the ambusher and who will be the defender. If one player sets up the terrain, then his opponent is allowed to choose which table edge he wishes to deploy on. If both players helped set up the terrain, or it was set up randomly, then roll a dice to see who gets the choice of table edge.
- The ambusher must roll a D6 for each detachment in his army apart from war engines and the supreme commander. On a roll of 1–3 the detachment starts in reserve. On a roll of 4–6 the detachment is deployed on the table or is available on the first turn in the case of flyers. At least one defending detachment will be deployed at the start of the game. If the defender fails to roll 4 or more for any of his detachments he must pick one of his detachments to deploy at the start of the game. Ambushing war engines always start in reserve, the supreme commander is always deployed at the start of the game (who did you think was the brains behind the ambush?).
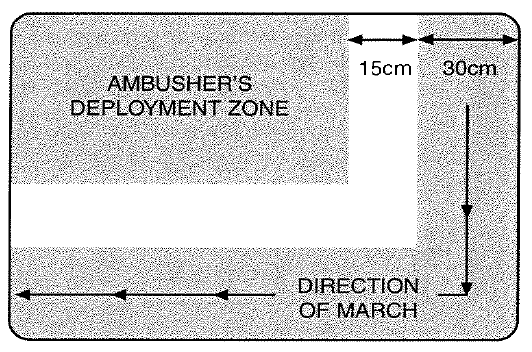
- The defender sets up first, within the deployment area shown on the map. All units must be facing in the direction of march shown on the map. The defender must set up his detachments one at a time. The first detachment must set up with at least one unit touching the table edge where the column entered. The next detachment must be placed further along the column of march, with all of its units ahead of the first detachment — the third detachment must be set up ahead of the second, and so on. Once all of the detachments have been set up they should be in a single long line running along the direction of march. Defending flyer detachments are in reserve at the start of the battle.
- The ambusher then sets up at least 15cm away from the defender's deployment zone. Ambushing infantry and vehicle detachments deploy using the Hidden Set-up rules. All remaining ambushing detachments are in reserve at the start of the battle (see Reserves and Hidden set-up).
Game length and victory conditions
The player that reduces the opposing army's morale to 0 or less first wins the battle. If this hasn't happened by the end of the 4th turn, or if both players' army morale falls to 0 or less on the same turn, then the player with the higher army morale level wins.
Ambush scenario
At present the ambush scenario tends to turn into an invitation to a kicking for the ambusher. To this end the following modifications apply to this scenario.
Forces and objectives
The attacker may pick up to half of their detachments instead of having to roll randomly. In addition each player must place one objective per 500 points of their force. All objectives are placed along the route of march.
The defender places Cleanse objectives. The first cleanse is placed 15cm away from the point where the route of march exits the table edge. The second cleanse is placed 30cm further back along the route of march from the first cleanse. The third Cleanse is placed 30cm back from the second cleanse and so on until all of the Cleanse objectives have been placed.
The attacker may place Capture and/or Bunker objectives. These are represented by immobile transport vehicles (Rhinos, Chimeras, etc.) which can be assumed to be carrying ammo, supplies etc. These can be placed along the route of march subject to the normal restrictions for placing objectives (i.e. not within 15cm of each other or the table edge), in addition the attackers objectives must be placed no further along the route of march than the most advanced detachment out of the defending force.
| [From Firepower #1 page 13 to 14.] |