On this page:
Refight 3: The Hellblade Mountains
| [Content from Battles Book page 76 to 78.] |
The campaign for Desolation Valley had raged for months on Rynn's World, with neither side able to gain the upper hand and strike a decisive blow. The battle lines had stabilised and a bloody war of attrition had begun. Attacks and counter-attacks were repulsed by both sides. The Imperial Guard artillery lit the night as it maintained its heavy bombardment of the Ork positions. Well dug in, with their backs to the Hellblade Mountains, the Orks would not be so easily moved. Commissar-General Mordrid van Horcic knew it would take a bloody direct assault to break the deadlock. Casualties would be high but he and his men were well prepared to make that sacrifice. He announced the battleplan at the very next staff meeting — all out attack, for the Emperor and Glory!
Captain Subodai of the Legio Astartes White Scars agreed. The Space Marine battle brothers would lead the first attack, that honour they demanded. He also had another condition. He would personally lead a force of hand picked White Scars in an attempt to traverse the dangerous Hellblade Mountains and outflank the Ork positions. Captain Subodai's veteran Space Marines, led by his Scouts, made their way high into the mountains undetected. At dawn two days later the order to attack was given, and screaming their battle prayers the Space Marines roared into the attack.
The following special rules are used in this scenario: Army morale, Objectives, Fortifications.
Forces
Each player picks their army to a pre-arranged points cost. Although the original battle was fought between the lmperium and Orks, any two armies may be used in this scenario.
Set-up
- Set up the terrain using any mutually agreeable method. Apart from the two foothill sections shown on the map, terrain is placed in the normal manner. The foothills represent the lower slopes of the Hellblade mountain chain. Use any mountainous or rocky terrain you have available, although hills and woods can be used instead at a pinch. The terrain in the two foothills areas should be fairly dense and hilly.
- Once all terrain is placed, each player rolls a D6: whoever gets the highest score becomes the attacker. Objectives are set up as described below, and then the attacker may split off up to a quarter of his army's points total as a flanking force. This enters on Turn 2 on one or the other (not both) of the foothill sections. The attacker must note down which set of foothills the flanking force will enter on before he sees the defender's set-up. The attacker may only use complete detachments as part of the flanking force, and the total points value of the detachments used must not exceed a quarter of the points of his army in total.
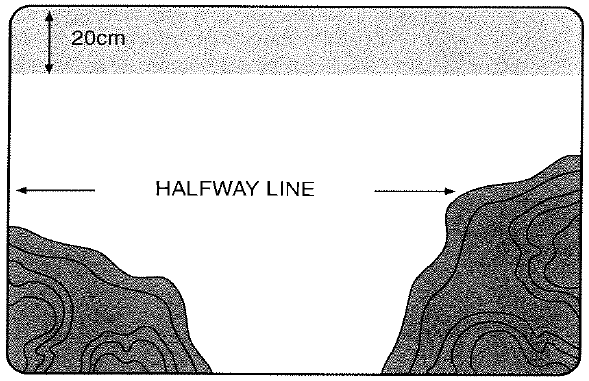
- Once the attacker has worked out what is in his flanking force and where it will enter, the defender deploys up to halfway in from his edge of the table. The attacker then sets up on the opposite edge, up to 20cm in from it. The defender may set up in fortifications if he wishes. Note that it is possible ( even likely) for defenders to end up positioned in the foothill sections.
- At the start of Turn 2 the attacker's flanking force arrives. The flanking force is set up by placing the HQ unit of each of the detachments in the force on the table edge of the foothill section where the flanking force was ordered to arrive. The position where the HQ is placed shows where the units from that detachment will enter play, and it is where their move must be measured from on the first turn. If several detachments want to enter at the same point simply place the HQs in a row, one in front of the other, and measure the moves from the rearmost HQ in the row. The defender is not allowed to snap-fire on units from the flanking force on the turn they arrive; his troops are too surprised to.
Objectives
The attacking player must place one objective per 500 points in his army (round fractions up). The defender places one objective per 1,000 points in his army, (rounding fractions down). For example, in a 1,500 point game, the attacker would place three objectives and the defender would place one.
The attacker can use any objectives apart from Rescue and Cleanse. The defender can only choose Cleanse objectives. See Objectives for information on how the objectives are placed on the table.
Game length and victory conditions
The player that reduces the opposing army's morale to 0 or less first wins the battle. If this hasn't happened by the end of the 5th turn, or if both players' army morale falls to 0 or less on the same turn, then the player with the highest army morale value is the winner.
Tactics
In this scenario there are great risks and gains to be made by both sides. By starting the game with the larger army (in points if not in numbers) the defender must capitalise on this early advantage as much as possible because by the end of Turn 2 he will be forced to go on the defensive. If your army is highly mobile like the Eldar or Space Marines with little or no static vehicles and artillery, the effects of a flank attack are lessened. Against the Imperial Guard this type of attack can be devastating.
So what can you do? You know for certain that an attack from one side or the other will take place and when, leaving only the strength of it in doubt. No matter what army you command, the one thing you can't do is ignore it. Any vulnerable vehicles should have infantry protection by the end of Turn 1. Close combat troops should be ready to counter attack or take cover should your opponent bring on units with a lot of firepower. Anything you feel that he is likely to attack should be placed on overwatch. Once his force is committed, your other flank is reasonably secure and taking into account this new enemy force you can revert back to your original battleplan.
While an outflanking move like this may only present a few additional targets to a fast moving army it can be a golden opportunity for the slower armies to strike at areas previously out of reach. The larger you make your flanking force the weaker your position becomes during the first turn. Still, a faint heart won't win the day and with a strong force, a good battleplan and surprise on your side you have the chance to inflict some crushing casualties.
Imagine the havoc a Goff mob or company of Baneblades with infantry support could cause on your enemy's baseline with their massed firepower. What Chaos General wouldn't give his right arm (or tentacle) to get a Greater Daemon and some good close combat followers so far across the board without being fired upon! Well, the payoff for these slower moving armies is obvious, but what about the Space Marines? Equipped with drop pods and Thunderhawk gunships they can land where they please anyway. However, even Space Marine armies have some slow troops and you can't fit a Titan in a Thunderhawk gunship! Sneaking a Titan or two on behind your foe could easily tip the whole battle your way. Above all, whether your flanking force is large, small or non-existent, your opponent is going to have to tie up large parts of his army in preparation for its arrival.
Historical forces
The forces which fought the opening engagement of the battle are listed below. The battle soon escalated as the Imperial Guard regiments and Titan Legions moved into the attack. Should you wish to increase the size of the battle then you could use other lmperium forces as reserves, and allow the Orks the appropriate number of reinforcements as well.
Orks: The Ork player has the following detachments:
Detachment 1 — Bogrot's Boyz, comprising one Warboss, one Weirdboy, twelve Ork Boyz units, one Nobz unit and nine Gretchin units.
Detachment 2 — Da Profeshernalz, comprising one Warboss, one Weirdboy and three Kommandos units.
Detachment 3 — Der Gunnerz, comprising one Warboss in a Battlewagon, three Shooty Boyz units and three Stompas.
Space Marines: The Space Marines have the following detachments:
Detachment 1 — Force Subodai, comprising one Space Marine Captain, two Terminator units and two Scout units. Historically it was Force Subodai that was used as the flanking force.
Detachment 2 — Force Kuanti, comprising six Land Raiders.
Detachment 3 — Force Susanowo, comprising one Space Marine Captain in a Rhino, three Tactical squads in Rhinos, and one Whirlwind.
Aftermath
As the Space Marines engaged, Captain Suodai made his move. The Space Marines' flank attack threw the Ork lines into confusion, while veteran Terminators and Scouts began the systematic clearing of the Ork fortifications. The second wave attack of the Imperial Guard then broke the Ork lines, whose reinforcements had been slowed down by the dense terrain of the foothills. The Orks turned and fled into the mountains. Captain Subodai was later posthumously awarded the Bravura Inviola for his role in the victory.